So, though I spend most of my craft time scrap booking and card making, I occasionally turn my hand to different crafts. I also loooove to spend time cruising around Pinterest. Wow! There are a LOT of very talented crafters out there!
Many moons ago, even before I had children, I was fascinated with doll houses and all things miniature. I built one doll house from scratch and after my daughter was born, I also made a doll house for her. These doll houses now live in the attic ...perhaps for the enjoyment of grandchildren some day {though not any time soon I hope!}.
I also love gardening and .....FAIRIES! I have never outgrown my secret hope that fairies are real and want to live in my garden.
A big trend on Pinterest these days is Fairy gardening! What a perfect match for me! Gardening,fairies and miniatures all rolled into one!
Check out My Fairy Board on Pinterest.
The Internet is host to many wonderful fairy garden sites and shops where you can buy just about anything for your mini garden. It's also a lot of fun to make your own accessories. I have used a combination of purchased and homemade items in my garden and would love to share them here with you today.
First and foremost I needed a house for my fairies to live in! I started with a small birdhouse that I bought at Dollarama.

Sorry ...I forgot to take a photo before I started! The little door was from Michael's {they have a small supply of miniatures}. I started by hammering the little bird landing post into the house and then I covered the bird entrance hole with this Michael's fairy door. I then used a combination of small decorative rocks {Walmart} and aquarium gravel to decorate the sides of my stone house. I used Glossy Accents glue to hold things in place and worked on small areas at a time...first adding a few bigger stones and then filling in with the smaller gravel.

I'm getting ahead of myself...I also painted a white square on each side of the door and penciled in a window opening which I then surrounded with a stone frame...

I finished off the windows by adding grills made from little sticks.

.
My house didn't have a chimney so I created one by cutting wide Popsicle sticks and gluing them together to form the chimney and then covering them with the aquarium gravel. The slits in the roof made it easy to attach it. I finished the roof by "painting" shingles with a combination of brown and black paint.

I also created a stone pathway with the aquarium gravel. I cut a winding shape from a thick chipboard and then, using the Glossy Accents again, I filled it in with pebbles and left it to dry.

So what's a fairy garden with out a bit of furniture? Every fairy needs somewhere to sit and and rest her bones and maybe have a cup of tea right?
Using a combo of Popsicle sticks and little branches from my cherry trees, I made a little table and chair set. I used the Popsicle sticks as bases for the chair seats and the table top and then added cherry pieces to build up the furniture.
Bottom of the chair....

and here it is after I added all the cherry wood {excuse my glue strings!}.

I made two chairs and then added a table using basically the same construction.

My little lunch was made from sculpting clay and then painted after it hardened.
I also made some picket fencing using cut up Popsicle sticks and fine wire ...but I forgot to take pictures...oops! You'll just have to see them in the finished garden.
My next step was to find a container to build my garden in. I originally picked up a decorative silver bowl at Walmart but quickly realized that I had too much "stuff" to fit in the bowl. I had seen several gardens on Pinterest done in broken terra cotta pots so imagine my excitement when I noticed my neighbor's garbage yesterday and sitting there in the middle was a huge broken terra cotta pot! Be still my heart! I'm sure she thought I was nuts when I asked for her garbage but she was quite pleased to see the finished product today! She said it took some of the sting out of her beautiful pot breaking to know that it still had a good use. Thanks Tina! I was also fortunate to find that one of my own terra cotta pots had become a freeze/thaw victim over the winter so I had a smaller pot to work with too.
Here's how I started.

I lined the larger pot with a little newspaper to cover the drain hole, added an inch or two of soil and then added the smaller broken pot facing the cracked part inward. I built up this layer { it's going to be a patio!} and then using an even smaller broken rim , I added the top layer. I used a combination of moss and saxifrage plants to help fill in the cracks and crevices. This helped to stop the soil from shifting.

I continued to added a stepping stone type of path up to the different levels using a combo of broken pot pieces and moss/saxifrage. I created my patio in the middle layer by layering in broken terra cotta pieces which I watered into place and then filled in between with white sandbox sand as my grout.A baggie with a tiny corner snipped off for the sand and a small paint brush were helpful in adding the sand. The archway was made from artificial pussy willow branches and a fake trailing plant.


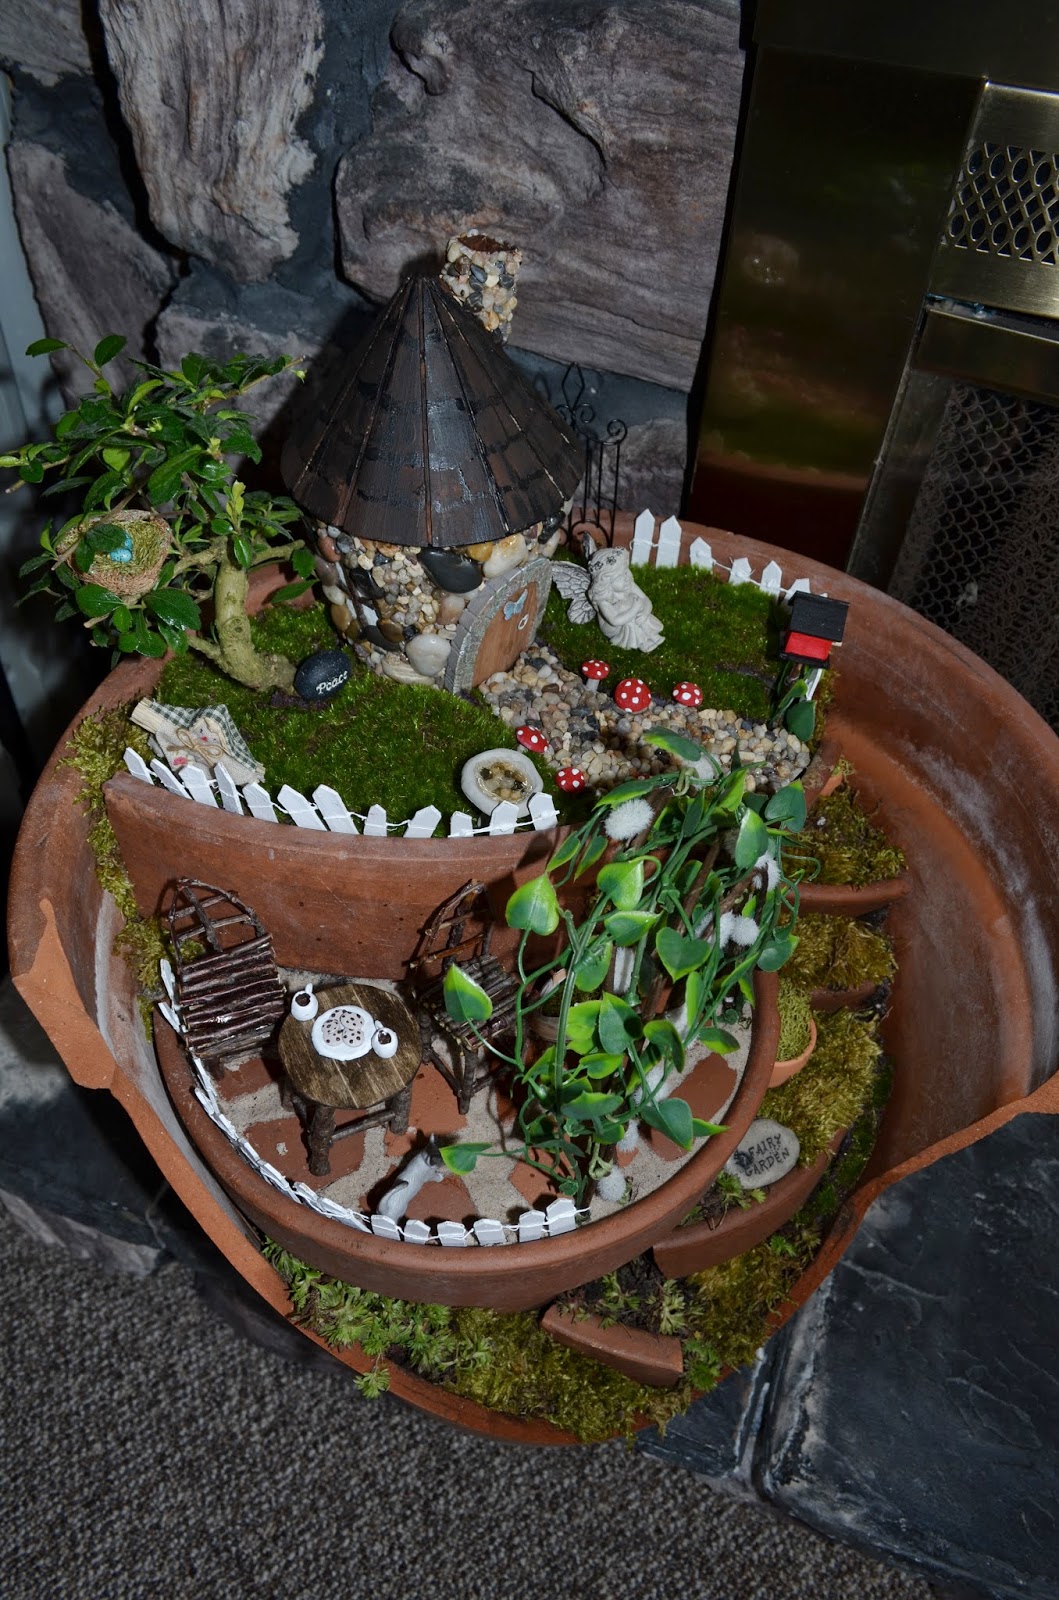
The top layer is"home"base. Here I added my fairy house and path and I also planted this super cute bonsai tree that I found in the plant department at Walmart. I added a fake grass {Michael's} on this level and then proceeded to add the finishing touches....a birdhouse, a birdbath complete with little stones and water { sculpting clay and Glossy Accents glue again!}. I love all the tiny accent pieces...did you see my handmade froggie on the patio level? Or how about my adorable clay mushrooms lining the path to the front door? The miniature terra cotta pots{Michael's} filled with moss add another bit of realism to my garden.
Here's my finished garden complete with a little fairy . She's kinda lonely but will soon be joined by three others that I ordered from The Fairy Garden . Can't wait for them to arrive. Due to the fact that it is just barely spring here in Nfld, my fairy garden will be staying inside for a while yet!


Isn't this little bird nest sweet? It's a Prima embellie...see I knew I could squeeze in something from my scrap booking stash!


Thanks for visiting today...and now I must get back to my scrap booking! Believe it or not I actually did manage to get a couple of layouts done yesterday on National Scrap Booking Day. Hope you got lots done this weekend...whatever your craft. Toodles!
PS . I will be entering my fairy garden in this year's contest going on over at MAGIC ONIONS . Check out how to enter your fairy garden creation HERE !!!! I'd love to see any of your creations too!
wow...how creative are you!!! Amazing project and it looks awesome!!
ReplyDeleteThis is just AWESOME!!! Love it SO much!!!! Adorable!
ReplyDeleteOh der lord * this is UNREAL. Can't wait to talk to you about it in a couple weeks!!
ReplyDeleteoh my WORD!!!!!!!!!! You are so incredibly creative and crafty!!! I am BLOWN AWAY !!!!!!!!!!!!!!!!!!!!!!!!!!!!!!
ReplyDeleteHoly Smokes Michelle! Absolutely gorgeous!
ReplyDeleteHow creative! I love it!!
ReplyDeleteThat is just fabulous!
ReplyDeleteWow! This is amazing!
ReplyDeleteHow creative ,it's amazing love it and will certainly be a conversation piece on your patio
ReplyDeleteWow, wow, wow....enough said! - Rexene
ReplyDeleteWow, this is absolutely stunning !! TFS !
ReplyDeleteSo cute!! I love it! Thanks for sharing!
ReplyDeleteSo adorable, I will try this project TFS!
ReplyDeletehttp://www.pinterest.com/hdsue/my-fairy-gardens-homes-and-accessories/ I made this using pvc pipe twigs from my yard and pine cones. The mushrooms I used furniture tack painted with nail polish and the flowers in the water can I made with jewelry wire and nail polish...
ReplyDeleteThank you for sharing your process. I adore it!
ReplyDeleteThis is absolutely amazing! What a fantastic project! I can't imagine how long it took to create the whole fairy garden. It makes me want to get out my terracotta pots and a hammer. TFS! Good luck with the contest!
ReplyDeleteThese pictures inspired me to go out into the sun and collect natural objects for a new fairy garden
ReplyDeleteHaha, its sunny here, looks like its nearly midnight where you are.
ReplyDeletecheers