Showing posts with label card tutorial. Show all posts

Thursday, October 4, 2012

A wedding Card and a Quick Idea for Keeping Track of Inks

A couple of weeks ago ,our family celebrated the wedding of the first "Grandchild" with the marriage of my niece, Ali to her sweet hubby, Ian.


It was a gorgeous September day...perfect for a fall wedding. A great big congrats to the happy couple!!! Ali and Ian's colors were purple and orange and everything was absolutely gorgeous . Her aunt, Janet Tucker, owner of COUNTRY FLOWERS here in Corner Brook, did her decorating and all her floral work and I have to say it was all breathtaking!
 
In keeping with their colors , I made this wedding card...


Here's a quick tutorial on how I made this card.
 
 
I started with a 51/2 "x 51/2" square card stock base . I then cut a 5"x5" piece of white cs and ran it through my CuttleBug to emboss it using the Brocade folder. Next I used a Martha Stewart Punch Around the Page set in "Swirling Lace " to punch a square border. Edges were inked with "Perfect Plum' from Stampin' Up.This was adhered to the base card.
Next I cut a strip of white cs approx 2.25" x 5" and punched the edges of both sides withStampin' Up's scallop edge punch and then cut a notch in one end.
 
 
 I thought it needed a little something else so I used my paper trimmer and a stylus as a quick scoring tool { I was too lazy to go dig out the proper scorer...but hey, it worked really well! }.


I then inked the edges with Perfect Plum SU ink and stamped the word "LOVE"  using a really old set of alpha stamps that I think were Recollections from Michael's. Set aside.
 
 
Now comes the fun part ...making the leaves and flowers. I used two stamp sets from HEARTFELT CREATIONS ...  some leafy swirls and another called Daisy Patch. I stamped two sets of leaves on white cs with the Perfect Plum ink and several sets of the daisy patch as I wanted to layer them for dimension. Unfortunately , these were older sets that didn't have the matching Spellbinders die cuts { which are so awesome BTW!} so I had to fussy cut everything...tedious lol.


{Yes I cut off the swirls...I'm not a total masochist!}
 
 
and here's the flowers after they've been fussy cut and adhered in layers...
 
The variations in color were created by just swiping the inked sponge over the stamped images until I was happy with the density of color...word to the wise ...add this color BEFORE you attempt to fussy cut them!
Now add a blob of Glossy Accents { or other suitable liquid glue } and pour on the micro beads!
 
 
and leave them to dry!
 
As a last little touch I used the Martha Stewart three butterfly punch on a scrap of white cs that I just dabbed some Perfect Plum ink on.


Now for the assembling.....
 
Run the "Love" strip through your fingers to give it a little curve. adhere to bottom of card as shown. Proceed to build the flower spray on the rt hand side . Add pearl bling as shown on card.


I'd like to show you one more quick idea for your inks. I like to have these tabs to hold against a paper I'm working with to find the closest match...rather than drag out all my inks. I can't take credit for this idea as such and I apologize to whoever came up with it. I've been using this for several years but can't remember the source...so if it's you, then congrats for coming up with such a brilliant idea.
 
 
I cut 2" tags out of white card stock using my Cricut { Storybook cartridge I think}. I actually did several 12 x12 sheets of cs while I was at it{ lots of spares for when I buy a new color rather than drag it all out again! }. I label each tag as I apply color from my ink pad and then dip the bottom half in clear embossing powder..that way I know what the color looks like embossed too....


I keep each brand { ie Tim Holtz Distress inks, Stampin' Up inks etc} on a separate binder ringer. I'm also a tad OCD and like to follow the ROY G BIV rule of colors so the binder rings make it easy to insert a new color in its rightful place on my ring.
 
 
Can I just add one more quick little thing? Of course I can....it's my blog! I'd like to wish a GREAT BIG HAPPY 19th BIRTHDAY to my dear daughter, Chelsea. Here she is sampling her first "legal" alcoholic beverage this evening at Jungle Jim's { drinking age is 19 here in NFLD}.
 
 
 and here's the card I made for her using the gorgeous G45 Ladies Diary pps that came in my Sept SCRAPTHAT kit...
 
 
PHEW!!!! Looooong post ! That's it for me tonight. Thanks for popping by. Toodles!


Friday, June 29, 2012

Happy Retirement Chris and the Anatomy of a Card


Well June 29 th has finally arrived and it's a bittersweet day at my Dialysis unit. After many, many years as a nurse, my boss, Christine, has retired. She had a fabulous send off with lots of presents, cards and well wishes for the future.

 Of course I couldn't let an event like this go by without making some little gift to commemorate it...here's a pic of the framed LO I gave her today.


There's a bit of a story behind this photo. Christine is actually an English lady and though she's been in Canada for many years now, she still holds her native land and the Royal family in high regard. { and yes,her nickname at work is MOTHER!} . Chris was all excited about the upcoming nuptuals between Prince William and Kate Middleton { obviously this was last year}. My co-worker , Carolyn got the brilliant idea that we should make Chris a fancy hat to wear while she was watching the wedding! So we took a facepan, covered it with a lovely blue linen saver and tied a ribbon of medical gauze around it. I then proceeded to make some pink roses from our disposable paper washclothes , and cut green leaves from the back of an x-ray requistion form. See how handy my scrapbooking skills are in real life!!!  We brought Chris into the center of our unit { the better to expose her to EVERYONE ---  patients and all }  and sat her down . We then made a little speech about the royal wedding, her english roots, blah blah blah...and presented her with her lovely wedding hat and a matching set of blue latex free gloves{ can't go to a royal wedding without your gloves!}. Chris is such a good sport! She loved her wedding attire and more than willingly posed  with a teacup for a photo. I really wanted to use this photo  for my goodby gift...and many thanks to Regina  for A} taking the photo to begin with and B} sending me ANOTHER copy of it last night when I was all in a panic because Rob had revamped my computer and I couldn't find the photo anywhere! BTW, the little limerick down in the corner reads:
        " From across the pond,Christine once came,
           English nurse was her claim to fame.
           There'll never be another
           Like our dear Mother
           And dialysis will never be the same."

And of course I had to make a homemade card to go with my gift. I'm currently involved with a card swap over at Crop Circles ... a Facebook group of Nfld girls . We had to make 18 identical cards to exchange. This design is what I came up with ...so I made one extra and just swapped out the "On Your Special Day " sentiment for "Happy Retirement".
 So here's the card:


and here's a quick little photo tutorial on how I made it.

Here are all my beginning pieces:


 The leaves were stamped on white cardstock with Versamark watermark ink using my all time fav leaf stamp from Heartfelt Creations , then sprinkled with clear emboss powder and heat set. I then rubbed in distress ink in "Shabby Shutters". Then I wiped the leaves with a paper towel thus removing the ink form the embossed areas and creating this pretty white and green leaf.
The banner pieces were punched using this awesome punch from Stampin' Up.


The punched egde center strip is also from Stampin' Up and the butterflies are from  Martha Stewart using this triple punch that I picked up recently.


The flower was made by first embossing a scrap of pink paper with the "Textile' folder and my Cuttle bug.

I then punched two circles , 1.5" and 2" and cut them as follows:


These are very similiar to the Tim Holtz Tattered flowers die cuts.  I then rounded them by cupping them in my hand and pressing the rounded edge of a paper piercer into it and then used the pointy end
to roll the edges. Add a little ink in colour of your choice  to the petal edges. Glue together , alternating the petals and finish with a pearl in the center.


 Start by adding your punched and inked edge strip to the bottom third of your card. Draw the black line around the perimeter of the card next { it actually added a lot to the card and helped to draw the eye in}. Now add one branch of the leaves to the rt hand side of the card and top with your handmade flower. Cut the other leaves apart and slip two under the flower as shown in the photo.


Now adhere your three banner pieces...don't worry if the corners overlap a little as you'll be covering them with the smallest butterflies.


Adhere the banner strip { I rounded mine a little but flat looks just as nice} and adhere the larger three burreflies /pearls as shown in the photo.


 Here's a little tip if you don't have a lot of sentiment stamps...use your COMPUTER! I simply typed out my sentiment in a Microsoft Office document using the font and script size of my choice. I double spaced the sentiment and just filled the page{ I think I fit nine to a page} . I then printed it on cardstock  and trimmed them all into the banner shape and inked the edges . It is amazing all the things you can create in Microsoft if you just play around with the fonts and stuff! Who needs stamps? GASP...no! scratch that! I cannot believe I just said that! LOL My Stampin' Up Rep, KATHY would kill me if she heard me say that!

Anyway, I finally come to the end of my rather long winded blog posting for today. Thanks for popping by and I hope you all have a great long weekend. Happy Birthday Canada and Happy Retiremnet to my dear friend , Christine!  Toodles


Sunday, January 22, 2012

Lattice Cards

Oh my goodness! It's been soooooo long since I've posted on my blog...I'm not sure if I remember how! LOL
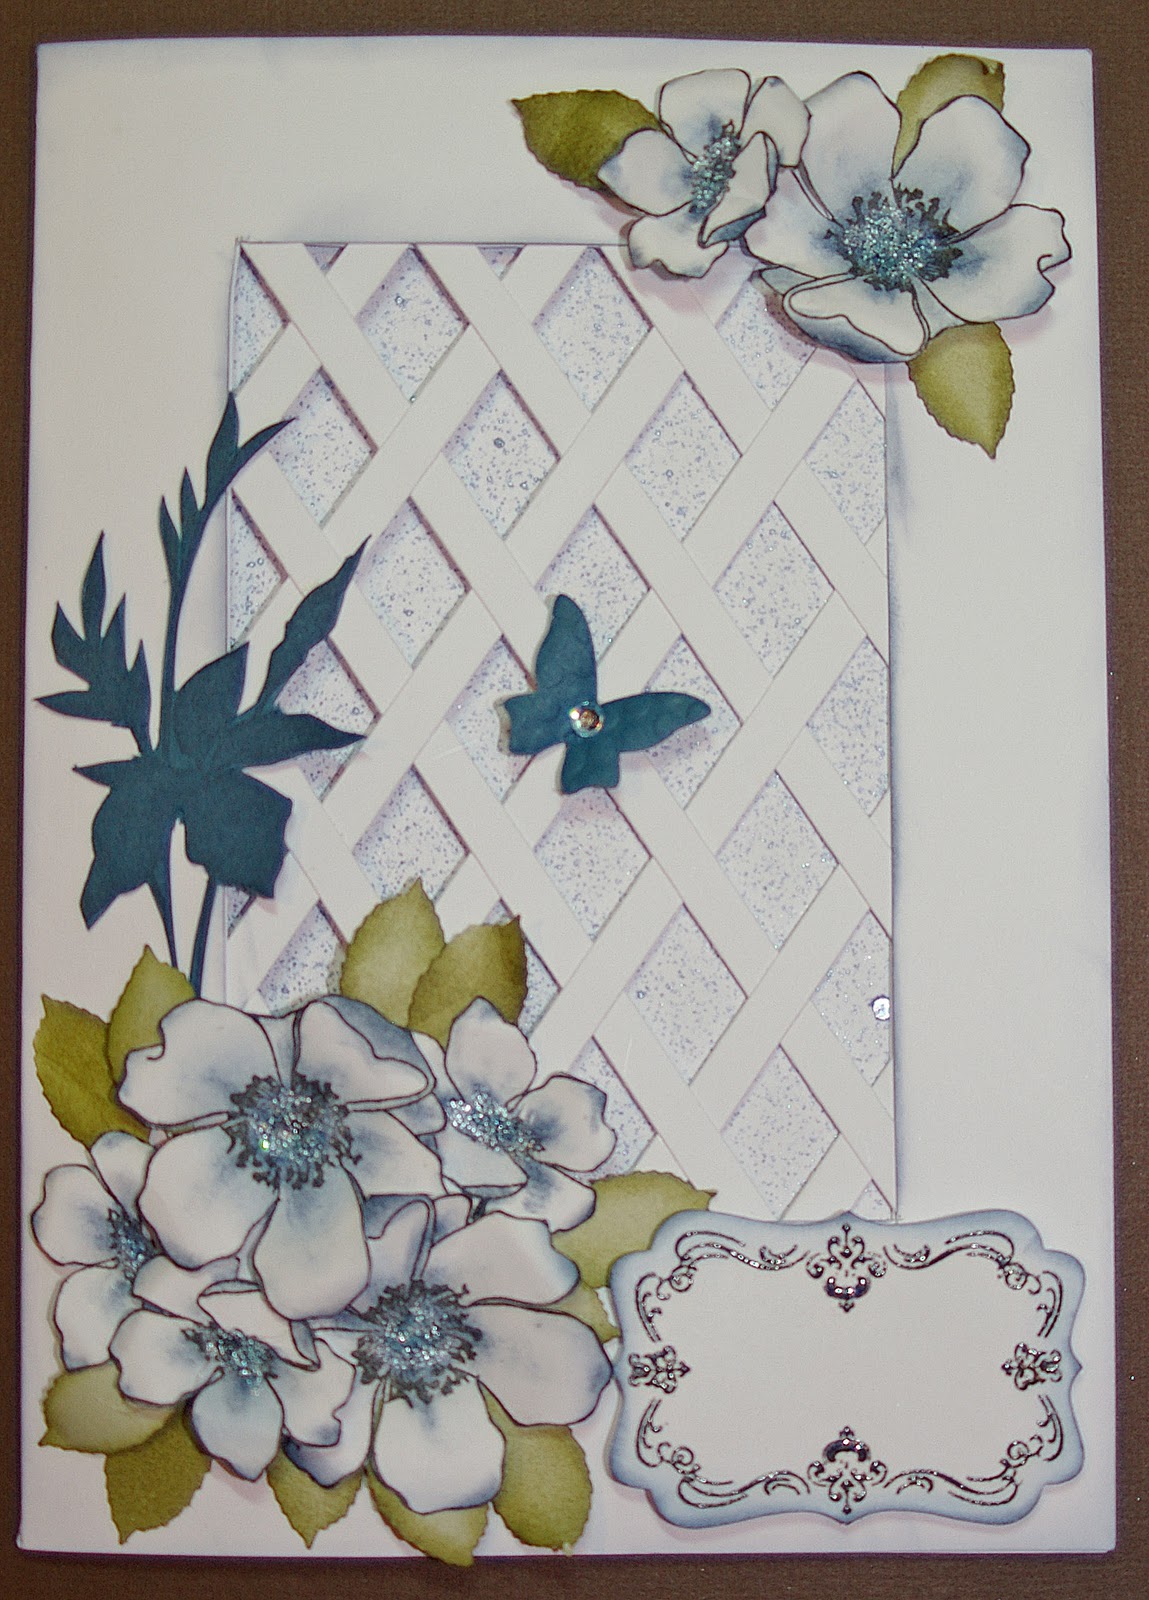
Today I'd like to share with you these beautiful lattice{some call them trellis} cards that I made over the last few days. I was inspired by my friend Peggy {AKA Planktorin on Scrapbook.com }. She had posted a beautiful lattice card a couple of days ago and I was immediately smitten!


Aren't they pretty? I have used both Stampin' Up inks {the yellow and blue cards} and Distress inks {the pink card} and will give you the appropriate colours in the supplies list below. I buy my Stampin'Up products from my friend Kathy at her on line shop. Check out her lovely BLOG for lots of beautiful card inspirations too!


                                                SUPPLIES

Two 5x7 cards {you'll see why you need two in a minute]
Stampin Up Stamp sets "Fabulous Florets " and "Four Frames"
SU punch Decorative label extra lg
SU Embosslit "Beautiful Wings" {or butterfly punch of choice}
Cuttlebug or BigShot if using the SU Embosslit
Martha Stewart punch "Rose Leaf" {or leaf punch of choice}
Clear emboss powder
Versamark or Stazon black ink
Stickles {Wild Honey for yellow flowers} or SU Dazzling Diamonds
Mistable inks in corresponding colours to flowers
SU Dimensional dots/3D Dots
Hot glue gun or wet glue of choice
Temporary adhesive
Exacto knife/metal ruler or die cut machine of choice
Bamboo skewer or sm paint brush handle
Scrap of green cardstock for punching leaves
Paper trimmer
INKS: Yellow flowers: SU Barely Banana, Crushed Curry, Dusty Durango, Chocolate Chip, and Old Olive
            Blue flowers    : SU Bashful Blue, Night of Navy, Old Olive, and Black Versamark/Stazon
            Pink Flowers   : Distress Inks in Victorian Velvet, Aged Mahogany and Forest Moss

Okay ... Don't let the long list intimidate you... Most of these supplies can be substituted for stuff you already have in your stash!
Ready , set, okay! Let's go........................

1. Cut one of the 5x7 cards in half. Using one of these extra 5x7 pieces and your trimmer, cut as many 1/4" x 7" strips as you can. Set aside.
2. Using the temporary adhesive , glue the second extra 5x7 piece to the inside of the front of the card {unless you are waaaay more talented than me with an exacto knife and multiple layers of cs LOL}. On your cutting mat, cut an opening 3"wide x 4 1/2 " long into this double layered card front approximately 1" down from the top. This is quite easily done with the exacto knife and ruler. However if you want a fancier shape for your opening {like I did on the pink card}, then you must use your Cuttlebug and dies {I used a Spellbinders label die} or perhaps a Cricut machine. Set aside the extra 5x7 windowed piece. Ink the inside edge of the card front opening now with a corresponding ink. It makes a nice contrast to the lattice pieces on the finished card.


3. On the inside of the window , begin by gluing lattice strips diagonally in all one direction, snipping off the overlapping tails as necessary. I found it helpful to start across the center and go from there.


 4. Begin the second layer by weaving the lattice strip in an alternating over/under pattern, again starting with the center strip. Make sure you do the opposite under/over with subsequent strips. This will give it a true weave. Trim off all overlapping tails. By now you card should look like this:


5. Remember the extra windowed 5x7 piece we set aside earlier? Glue this to the inside of your card front  making a "sandwhich' with the strips in the middle. This makes it all neat and pretty on the inside . If you find my instructions difficult to follow , then check out this awesome video tutorial at Christina's place. Just click on video tutorials {in pink} on the left hand side of her opening page and then pick "Trellis Card" in the list of tuts.

 6. Now to the fun floral part. With the SU Fabulous Florets stamp set, stamp three large open face flowers and four smaller open face flowers per card on white cs. Use Chocolate Chip ink for the yellow card or Stazon Black for the blue flower cards. Stamp one of the leaf spray from the set for each card...use Dusty Durango for the yellow card leaf spray and Night of Navy for the blue card. I actually stamped these leaf sprays on a scrap of cs that was slightly lighter than the Dusty Durango  and Night of Navy inks , but it would be just as nice stamped on white cs using these inks. I then fussy cut out all these pieces. I did trim as close to the line as possible but found it sharpened up the images if I went back over the edges with the same colour ink on a little sponge afterwards.  Then using either a Stampin'Up blender pen or just a plain old Q tip, I added colour to the centers of the flowers in a circular motion and little dabs of colour on the flower edges. Start with the lightest colour inks  and work towards the darker colours. You'll know when to stop adding ink to your flowers.
7.  Cup each flower one by one in your palm and using a rounded edge tool {Basic Grey has a great rub on tool that works well} or even the round finger hole at the end of a small pair of scissors, apply pressure  in a circular motion to the center of the flower to help cup it up. Use a bamboo skewer or a small paint brush handle and run it under a few petals to round up the petals a little. I love my flowers to have a bit of 3D effect to them . But you could leave them perfectly flat if you are not comfortable with paper manipulation. Add  a spot of Stickles or glue and Dazzling Diamonds to the centers of your flowers and set aside to dry.

8. Punch 15-20 leaf shapes from scrap of light green cs. Ink the edges with the green ink and using the bamboo skewer or brush handle round some of the leaves to give them a 3D effect too . Leave a few flat {or again, all of them if you're not comfy with paper manipulating}. Set aside.

9.Using a corresponding cs scrap {or a white cs scrap with ink sponged on it}, cut out butterflies with either the SU Embosslit set or a butterfly punch. Set aside.

10. Using the SU "Four Frames" stamp set stamp the label, sprinkle with clear emboss powder and heat set. Punch out with the corresponding SU punch. Ink edges with corresponding colour to flowers. You can stamp on a sentiment now if you know what you are using the card for. I left mine blank for a later date.


I found it best to do all this "busy work" at the same time . Now comes the fun part...ASSEMBLING!


11.Start by adhering the leaf shadow piece to the left hand side of the card . Add the flowers next. I used two large and three small in the bottom corner and one large and one small in the upper corner. I used a dimensional dot for one of the small flowers in each corner just to add to the 3D effect. Next tuck in your leaves as you see fit.
{A little hint: I had a scrap piece of paper under the lattice so no glue would get on the inside of the card. you do have to be careful of glue placement when adding your embellies.}

12. Finish by inking the outside edge of card in colour of choice and spritz a little ink on that extra 5x7 piece of cs and glue it to the inside of the card when dry. Alternately, you could add a piece of subtle patterned paper to the inside. This "colour" on the inside of the card really helps to show off the lattice pattern. Add the punched butterfly to the center of the lattice and add your sentiment label with a dimension dot. Here's a pic of the finished blue card. All done... PHEEEEEEEEWWWWWWWW....

      
 No I'm not really done! One last little note. The pink card flowers are obviously not Stampin'Up. They are handmade flowers with a sprinkling of small pink flowers punched with a retro flower punch. I shared how to make these flowers on a previous posting titled "A Study In White". You can check them out there. Thanks for dropping by today and happy scrapping!