Showing posts with label mini tutorial. Show all posts

Sunday, May 4, 2014

My Fairy Garden and a few Tutorials

So, though I spend most of my craft time scrap booking and card making, I occasionally turn my hand to different crafts. I also loooove to spend time cruising around Pinterest. Wow! There are a LOT of very talented crafters out there!
Many moons ago, even before I had children, I was fascinated with doll houses and all things miniature. I built one doll house from scratch and after my daughter was born, I also made a doll house for her. These doll houses now live in the attic ...perhaps for the enjoyment of grandchildren some day {though not any time soon I hope!}.
I also love gardening and .....FAIRIES! I have never outgrown my secret hope that fairies are real and want to live in my garden. 
A big trend on Pinterest these days is Fairy gardening! What a perfect match for me! Gardening,fairies and miniatures all rolled into one!
Check out My Fairy Board on Pinterest.

The Internet is host to many wonderful fairy garden sites and shops where you can buy just about anything for your mini garden. It's also a lot of fun to make your own accessories. I have used a combination of purchased and homemade items in my garden and would love to share them here with you today.

First and foremost I needed a house for my fairies to live in! I started with a small birdhouse that I bought at Dollarama.


Sorry ...I forgot to take a photo before I started! The little door was from Michael's {they have a small supply of miniatures}. I started by hammering the little bird landing post into the house and then I covered the bird entrance hole with this Michael's fairy door. I then used a combination of small decorative rocks {Walmart} and aquarium gravel  to decorate the sides of my stone house. I used Glossy Accents glue to hold things in place and worked on small areas at a time...first adding a few bigger stones and then filling in with the smaller gravel.


I'm getting ahead of myself...I also painted a white square on each side of the door and penciled in a window opening which I then surrounded with a stone frame...


 I finished off the windows by adding grills made from little sticks.

My house didn't have a chimney so I created one by cutting wide Popsicle sticks and gluing them together to form the chimney and then covering them with the aquarium gravel.  The slits in the roof made it easy to attach it. I finished the roof by "painting" shingles with a combination of brown and black paint.


I also created a stone pathway with the aquarium gravel. I cut a winding shape from a thick chipboard and then, using the Glossy Accents again, I filled it in with pebbles and left it to dry. 


So what's a fairy garden with out a bit of furniture? Every fairy needs somewhere to sit and and rest her bones and maybe have a cup of tea right? 
Using a combo of Popsicle sticks and little branches from my cherry trees, I made a little table and chair set. I used the Popsicle sticks as bases for the chair seats and the table top and then added cherry pieces to build up the furniture.

Bottom of the chair....


and here it is after I added all the cherry wood {excuse my glue strings!}.


I made two chairs and then added a table using basically the same construction.


My little lunch was made from sculpting clay and then painted after it hardened.
I also made some picket fencing using cut up Popsicle sticks and fine wire ...but I forgot to take pictures...oops! You'll just have to see them in the finished garden. 

My next step was to find a container to build my garden in. I originally picked up a decorative silver bowl at Walmart but quickly realized that I had too much "stuff" to fit in the bowl. I had seen several gardens on Pinterest done in broken terra cotta pots so imagine my excitement when I noticed my neighbor's garbage yesterday and sitting there in the middle was a huge broken terra cotta pot! Be still my heart! I'm sure she thought I was nuts when I asked for her garbage but she was quite pleased to see the finished product today! She said it took some of the sting out of her beautiful pot breaking to know that it still had a good use. Thanks Tina! I was also fortunate to find that one of my own terra cotta pots had become a freeze/thaw victim over the winter so I had a smaller pot to work with too. 

Here's how I started.


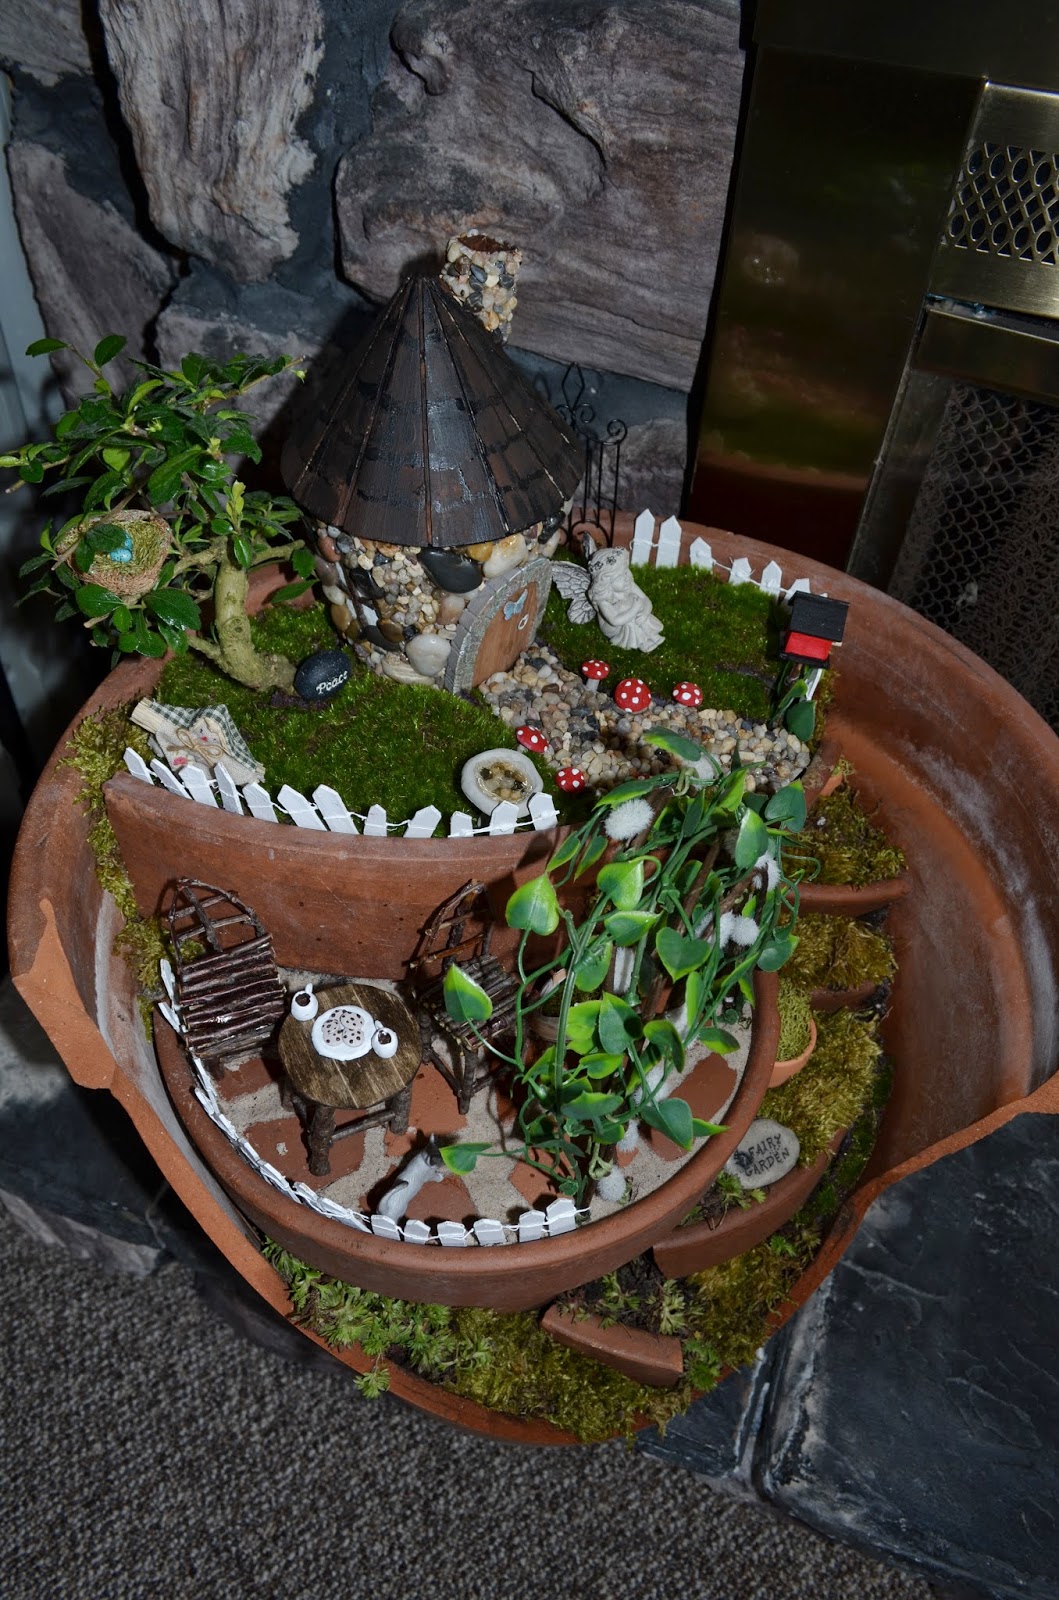
 I lined the larger pot with a little newspaper to cover the drain hole, added an inch or two of soil and then added the smaller broken pot  facing the cracked part inward. I built up this layer { it's going to be a patio!} and then using an even smaller broken rim , I added the top layer.  I used a combination of moss and saxifrage plants to help fill in the cracks and crevices. This helped to stop the soil from shifting.


I continued to added a stepping stone type of path up to the different levels using a combo of broken pot pieces and moss/saxifrage. I created my patio in the middle layer by layering in broken terra cotta pieces which I watered into place and then filled in between with white sandbox sand as my grout.A baggie with a tiny corner snipped off for the sand and a small paint brush were helpful in adding the sand. The archway was made from artificial pussy willow branches and a fake trailing plant. 


The top layer is"home"base. Here I added my fairy house and path and I also planted this super cute bonsai tree that I found in the plant department at Walmart. I added a fake grass {Michael's} on this level and then proceeded to add the finishing touches....a birdhouse, a birdbath complete with little stones and water { sculpting clay and Glossy Accents glue again!}. I love all the tiny accent pieces...did you see my handmade froggie on the patio level? Or how about my adorable clay mushrooms lining the path to the front door? The miniature terra cotta pots{Michael's} filled with moss add another bit of realism to my garden.

 Here's my finished garden complete with a little fairy . She's kinda lonely but will soon be joined by three others that I ordered from The Fairy Garden . Can't wait for them to arrive. Due to the fact that it is just barely spring here in Nfld, my fairy garden will be staying inside for a while yet! 


Isn't this little bird nest sweet? It's a Prima embellie...see I knew I could squeeze in something from my scrap booking stash! 


Thanks for visiting today...and now I must get back to my scrap booking! Believe it or not I actually did manage to get a couple of layouts done yesterday on National Scrap Booking Day. Hope you got lots done this weekend...whatever your craft. Toodles!
PS . I will be entering my fairy garden in this year's contest going on over at MAGIC ONIONS . Check out how to enter your fairy garden creation HERE !!!! I'd love to see any of your creations too!

Monday, April 9, 2012

Mini Baby Album in a Tin/Graphic 45 Tutorial

I'm so excited this week waiting for my friend ,Trina, to come back from Iqaluit . She will be bringing home her precious new daughter, Carlie, a little sister for Mackenzie. Two very lucky little girls who are blessed with such wonderful parents in Trina and Svein!

I warned you that I wasn't finished play with Graphic 45 's adorable Little Darlings line of pp. I found these gift card holder tins at Walmart a couple of weeks ago in the card section for $1 each.


The black card holder part was very easily removed  from the tin and I immediately thought " Hmmmm...this would make a cute little holder for a mini book......".And so I turned it into this!


 And this is what it looks like on the inside....an accordion style book with pages for photos and pages with little tag inserts for Trina to jot down little tidbits about her sweet little Carlie. The last page is adhered to the inside of the tin.


 Here's a view of the back side of the accordion book.....


This would make a very sturdy brag book to carry in your purse as the tin seals tight and protects all the contents.

So here's a quick little peek at how I made this little book.

As stated above, I first removed the card holder insert and discarded it. I then flipped the tin over and measured it to determine the size I would need for my page bases. My tin measured 11.5 cm long by 9 cm wide. I decided to cut my base a little smaller at 11cm x 8.5 cm and I knew I wanted to make it "accordion" style, so I marked my plain cardstock as shown on the next photo.


I cut out three identical pieces, adhering them end to end to make a longer accordion. I then rounded each corner with an EK Success corner rounder punch as the tin itself had rounded corners.


 Next I inked all edges and seams in between the pages both front and back with Distress Ink in Vintage Photo.


Eeeeewwww...looks messy doesn't it? Don't worry. It'll just have a little distressed edge showing when we are done.

 I then proceeded to cut out my actual pages , 8 cm x 10.5 cm . I used a variety of papers from the  G45 Little Darlings pps. I rounded all these corners as well and also inked all edges with DI Vintage Photo.  .

I chose five pages to be journal pages. To make these, I first cut out five baby pictures/blocks off the " Bundle of Joy" sheet . I attached them to their respective pages by using 1/8 th" skor tape on just the sides and across the bottom thereby creating a little pocket for my journaling tags. I used standard 4 3/4 x 2 3/8 shipping tags which I trimmed slightly in both width and length to fit in my pockets. I also punched the bottom edges with the Eyelet Lace punch by Martha Stewart and inked all edges.


Here's a close up of two finished pages.


 And here are all my "finished' pages:


 The 'bands' across the bottoms of the pages are only adhered on the back of the pages so that a photo may be slipped underneath.
 Now proceed to glue down your pages to the base in whatever order you desire.  I punched and inked a bunch of butterflies  with the classic Martha Stewart butterfly punch and added them nilly willy on my pages for a little additional decoration. One more note. I cut the' Rock a Bye Baby' piece from the "Bundle of Joy' sheet, punched the corners with the rounder, inked all edges and slipped it under the ribbons to complete the front of the tin and viola! a unique, sturdy little present for sweet Carlie!

 Of course, what's a gift without a card , right?  I whipped up this little card from my scraps to go along with this present.


 Thanks so much for popping by again today. I can't believe I've done a posting TWO days in a row.  Can I make it three???? ummmmmm...let me think about it ! LOL Toodles

Wednesday, March 14, 2012

Mini Book of Big Love and Framed 3D Class

I am getting sooo excited as my crop draws nearer. I already have eleven ladies signed up in the first few days of advertising! I could actually fit 30 in total if I really squeeze them in there LOL. It sure would be fun to have a full house.
 
At my last crop I taught a simple mini that I had designed. It was well received . This time I thought I'd try something a little different. It is a little hard to teach to a bigger group so I'm going to have a couple of items on display and people can sign up for a project to be taught at my home {and to a smaller group} at a later date. I feel I'll be able to give more attention to the ladies in smaller groups. 
  
My first project that I'd like to teach is this sweet little mini album that I made for hubby for Valentine's Day this year.This book is made from chipboard and was soooo easy to construct. I found the original directions on a Memory Makers blog posting but can't seem to get the link to open up here tonight..GRRRRR. I did, however, have the foresight to actually print off the directions when I originally came across it... I can make you a photocopy if you would like one. Hubby was really touched by this little book and thought it was a lovely Valentine's day gift.


I used a combo of some ATD papers that I purchased at Walmart and some of the gorgeous Bonjour line of pps from KAISER.

Here's a few more close ups....


I added a pocket to each page and the matching little book of tags that corresponded with the Bonjour pps was perfect for my journaling spots. I hand wrote a little love quote on each tag before tucking them in the book. This was a very easy project ..and easy to adjust size-wise too. The original was a 3x3  book but I enlarged it to 4x4 with minimal fuss.

My second project that I'm offering as a class is this adorable 3D frame I created using BO BUNNY
 Gabrielle pps. I must mention that I was inspired to design this after drooling over a gorgeous off-the-page project created by my dear friend KELLY that she taught at her LSS, The Urban Scrapbook, in Edmonton a few months ago. Check out her blog posting for Dec 2nd, 2011 and drool over her gorgeous creation too {make sure to wipe the moisture off your keyboard! LOL}. So without further ado...here's my 3D frame!


And here's a few close ups...


The resist inking on this tag is one of the techniques I'll be sharing in this class.

These little flowers were made using the Tim Holtz tattered flowers die. Leaves are cut with my Cricut and I made the cute little pin tucked in amongst the flowers too!

 And finally here's a close up of the gorgeous shabby chic banner that I've made for this project. This banner was the brain child of Mandy {aka Craftysprinkles} and you can check out her awesome tutorial on how to make this little lovely!

Well that's it for today . Give me a call or email me at m.marks@nl.rogers.com if you'd like to join us on our crop on April 1st! I'll hold a spot for you! Toodles and thanks for dropping by!