Thursday, March 8, 2012

March Sketchy Challenge

Happy sunny spring-like day! The sun is shining, the snow is melting and the water is running...and that makes me HAPPY!  There may be some nice things about winter...but I'm hard pressed to name them.Can you tell I'm a summer girl?????
    
Time for another Sketchy Challenge over at Canadian Scrapbooker  -another sketch by the super talented Jill Sarginson .


And here's my take on this fun sketch!


These pics were taken a few years ago at our local INSECTARIUM - one of only two in all of Canada!
Right here in little old Newfoundland! I could spend all summer in their beautiful butterfly pavilion. It is so peaceful  to have all these gorgeous jewel-like winged creatures fluttering all around you as you sit by the little pond. Amazing!  If you ever get a chance to visit the west coast of Nfld, make sure to put the insectarium on your To- Do list!
I used mostly Pink Paislee Butterfly Garden pps for this LO { seemed appropriate LOL}. The banner punch is my new play toy from KATHY -my Stampin'Up rep. Isn't it cute? I can see me getting LOTS of use from this punch!

Thanks for popping by today. Hope it's warm and sunny in your neck of the woods!

Sunday, February 5, 2012

A Scrap Happy Weekend and some Challenges

I absolutely love it when I get a stretch of 3-4 days off from work! I try to blow through the housework as fast as I can so I can settle into my little scrappy nest relatively guilt free!  My first project this weekend was this super cute LO of my nephew, Nathan. As soon as I saw his adorable smile on his kindergarten picture, I knew why I'd been hoarding the G45 ABC Primer pps that dear KELLY had gifted me with when I visited back in October.


 Lots of fussy cutting going on here. I just can't seem to scrap in one flat dimension anymore ...always gotta be manipulating pp and poking 3D dots under everything! I had a ton of these pps left over  so I think I may do a mini album for Scott ...or a birdhouse that looks like a school house ...or...well , you'll just have to drop back and see. BTW, G45 has a Design Team call on right now. You can link to it HERE  .  Lots of other ongoing DT calls listed there too so check it out!

Well I absolutely ashamed to admit that I missed not one but TWO Sketchy challenges over at CANADIAN SCRAPBOOKER . I don't know why...time just seemed to have slipped away from me! Well I'm on top of it this month! Check out the latest sketchy challenge ...another great sketch by Jill Sarginson.


I thought it was so sweet and romantic...really lends itself to Valentine's day LOs doesn't it? Here's my take on this pretty sketch.


 As you can see, I stuck pretty close to the sketch.  Do you see anything missing  from this LO? How about patterned paper???? This Lo was done with just cardstock !  I really enjoyed making all the little rolled flowers... I think I may have seen  a tutorial for them { or a link to them ] over at GABRIELLE"S  place. Very easy to make with just some scraps I had kicking around. The larger flowers were made with the Tim Holtz Tattered Flower dies. I like the subtle dot texture on the hearts. I used my Cuttlebug  emboss folders and did a little inking on the edges. Here's a close up of the flowers....


The leaves were stamped with a  Heartfelt Creations stamp. Still my favorite stamp by them to date.

Meanwhile, over at the THE PAPERIE blog, Meaghan  had added the following PAGEMAPS  card sketch to their Mojo Monday challenge.


 I had some flowers leftover form my "Lucky" Lo so I used them to decorate my take on this challenge.


As you can see I chose  to rotate the sketch and put the sentiment along a different side ...but , heh,. that's what sketches are for ...as a STARTING point right?  I Think I'll send this to Mom and Dad for Valentine's Day ...shhhh...it's a secret.
Well , on that note , I think I'll sneak back down over the basement steps  to my little womancave and finish working on another LO. I'm using the beautiful Glitz Vintage Blue kit that I got from ScrapThat a couple of months ago. I'm using a sketch from CREATIVE SCRAPPERS { #193 by Amarilys Doria}. Hopefully I'll get a chance to share that with you later this week. Thanks for dropping by and happy scrapping!
PS. I have the venue booked for my next crop day. Mark it on your calendars...April 1st. More details in the next few days. Toodles!

Friday, February 3, 2012

Check out this giveaway

Northridge Publishing and Peachy Cheap have teamed up to have a great Friday giveaway. Check it out HERE
 I buy from Peachy Cheap fairly regularly. You can get some awesome deals there! Have a scrappy day and good luck!

Sunday, January 22, 2012

Lattice Cards

Oh my goodness! It's been soooooo long since I've posted on my blog...I'm not sure if I remember how! LOL
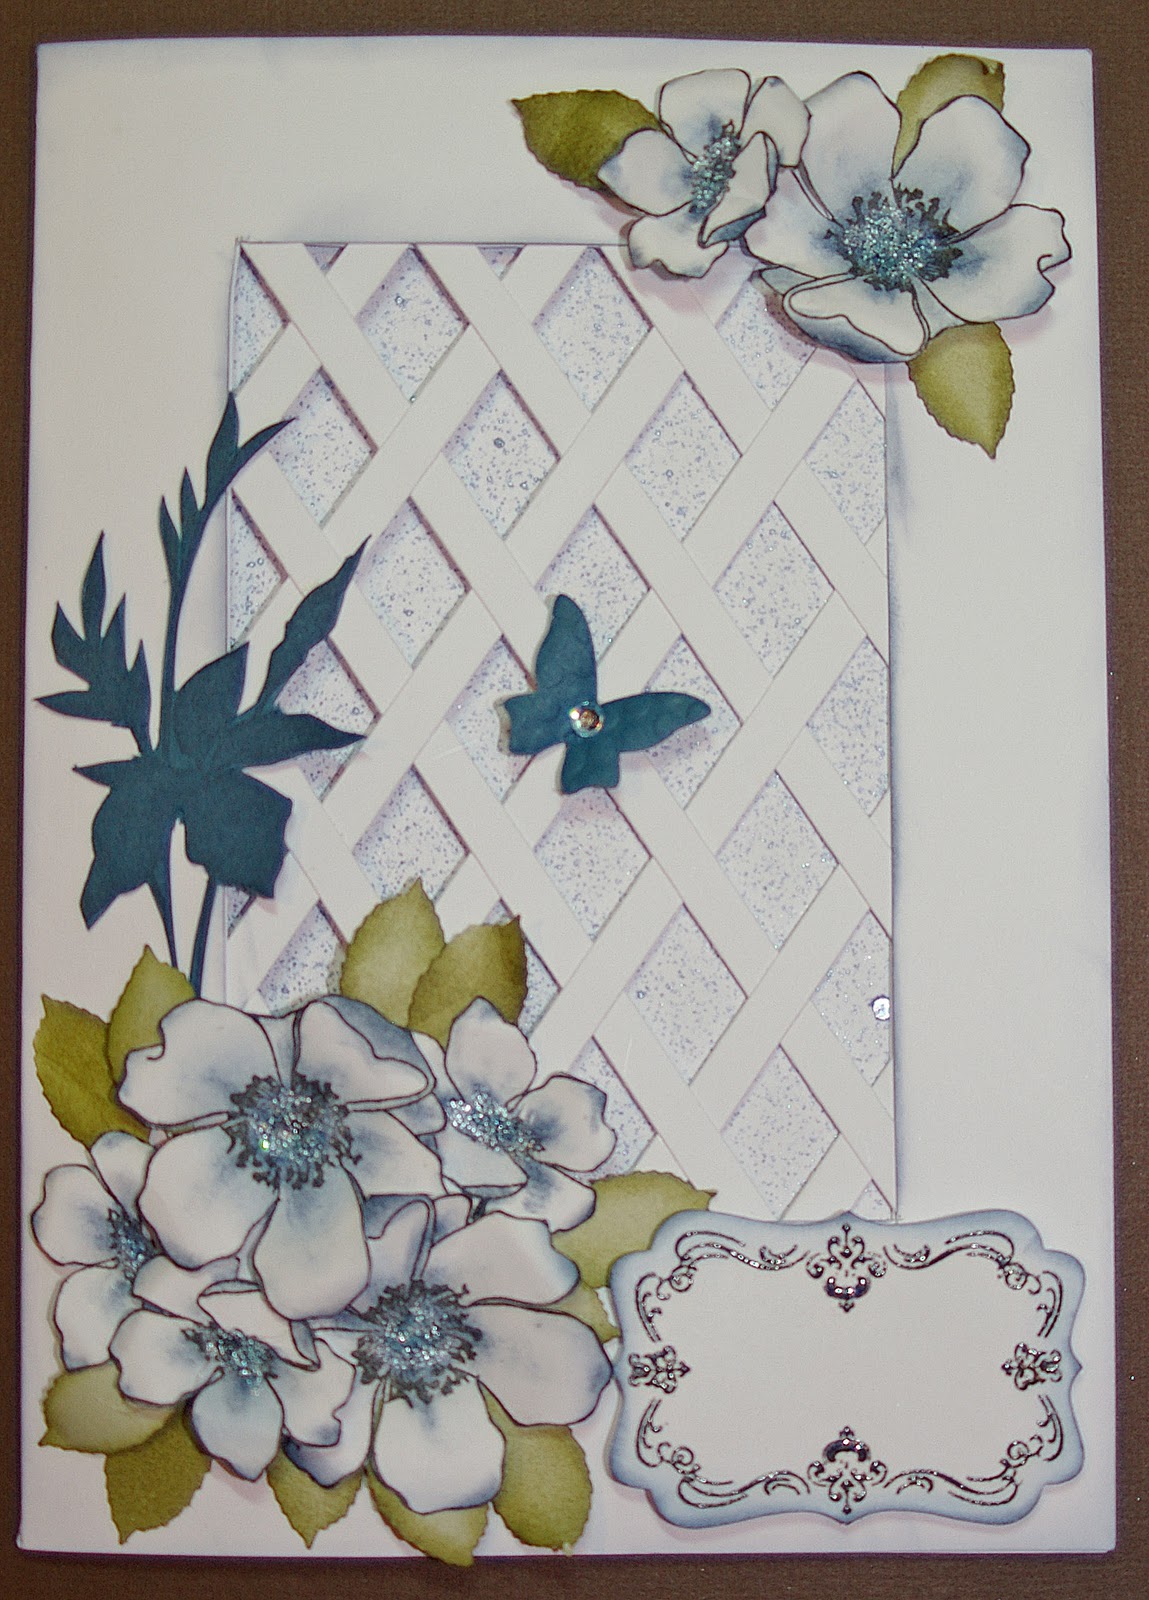
Today I'd like to share with you these beautiful lattice{some call them trellis} cards that I made over the last few days. I was inspired by my friend Peggy {AKA Planktorin on Scrapbook.com }. She had posted a beautiful lattice card a couple of days ago and I was immediately smitten!


Aren't they pretty? I have used both Stampin' Up inks {the yellow and blue cards} and Distress inks {the pink card} and will give you the appropriate colours in the supplies list below. I buy my Stampin'Up products from my friend Kathy at her on line shop. Check out her lovely BLOG for lots of beautiful card inspirations too!


                                                SUPPLIES

Two 5x7 cards {you'll see why you need two in a minute]
Stampin Up Stamp sets "Fabulous Florets " and "Four Frames"
SU punch Decorative label extra lg
SU Embosslit "Beautiful Wings" {or butterfly punch of choice}
Cuttlebug or BigShot if using the SU Embosslit
Martha Stewart punch "Rose Leaf" {or leaf punch of choice}
Clear emboss powder
Versamark or Stazon black ink
Stickles {Wild Honey for yellow flowers} or SU Dazzling Diamonds
Mistable inks in corresponding colours to flowers
SU Dimensional dots/3D Dots
Hot glue gun or wet glue of choice
Temporary adhesive
Exacto knife/metal ruler or die cut machine of choice
Bamboo skewer or sm paint brush handle
Scrap of green cardstock for punching leaves
Paper trimmer
INKS: Yellow flowers: SU Barely Banana, Crushed Curry, Dusty Durango, Chocolate Chip, and Old Olive
            Blue flowers    : SU Bashful Blue, Night of Navy, Old Olive, and Black Versamark/Stazon
            Pink Flowers   : Distress Inks in Victorian Velvet, Aged Mahogany and Forest Moss

Okay ... Don't let the long list intimidate you... Most of these supplies can be substituted for stuff you already have in your stash!
Ready , set, okay! Let's go........................

1. Cut one of the 5x7 cards in half. Using one of these extra 5x7 pieces and your trimmer, cut as many 1/4" x 7" strips as you can. Set aside.
2. Using the temporary adhesive , glue the second extra 5x7 piece to the inside of the front of the card {unless you are waaaay more talented than me with an exacto knife and multiple layers of cs LOL}. On your cutting mat, cut an opening 3"wide x 4 1/2 " long into this double layered card front approximately 1" down from the top. This is quite easily done with the exacto knife and ruler. However if you want a fancier shape for your opening {like I did on the pink card}, then you must use your Cuttlebug and dies {I used a Spellbinders label die} or perhaps a Cricut machine. Set aside the extra 5x7 windowed piece. Ink the inside edge of the card front opening now with a corresponding ink. It makes a nice contrast to the lattice pieces on the finished card.


3. On the inside of the window , begin by gluing lattice strips diagonally in all one direction, snipping off the overlapping tails as necessary. I found it helpful to start across the center and go from there.


 4. Begin the second layer by weaving the lattice strip in an alternating over/under pattern, again starting with the center strip. Make sure you do the opposite under/over with subsequent strips. This will give it a true weave. Trim off all overlapping tails. By now you card should look like this:


5. Remember the extra windowed 5x7 piece we set aside earlier? Glue this to the inside of your card front  making a "sandwhich' with the strips in the middle. This makes it all neat and pretty on the inside . If you find my instructions difficult to follow , then check out this awesome video tutorial at Christina's place. Just click on video tutorials {in pink} on the left hand side of her opening page and then pick "Trellis Card" in the list of tuts.

 6. Now to the fun floral part. With the SU Fabulous Florets stamp set, stamp three large open face flowers and four smaller open face flowers per card on white cs. Use Chocolate Chip ink for the yellow card or Stazon Black for the blue flower cards. Stamp one of the leaf spray from the set for each card...use Dusty Durango for the yellow card leaf spray and Night of Navy for the blue card. I actually stamped these leaf sprays on a scrap of cs that was slightly lighter than the Dusty Durango  and Night of Navy inks , but it would be just as nice stamped on white cs using these inks. I then fussy cut out all these pieces. I did trim as close to the line as possible but found it sharpened up the images if I went back over the edges with the same colour ink on a little sponge afterwards.  Then using either a Stampin'Up blender pen or just a plain old Q tip, I added colour to the centers of the flowers in a circular motion and little dabs of colour on the flower edges. Start with the lightest colour inks  and work towards the darker colours. You'll know when to stop adding ink to your flowers.
7.  Cup each flower one by one in your palm and using a rounded edge tool {Basic Grey has a great rub on tool that works well} or even the round finger hole at the end of a small pair of scissors, apply pressure  in a circular motion to the center of the flower to help cup it up. Use a bamboo skewer or a small paint brush handle and run it under a few petals to round up the petals a little. I love my flowers to have a bit of 3D effect to them . But you could leave them perfectly flat if you are not comfortable with paper manipulation. Add  a spot of Stickles or glue and Dazzling Diamonds to the centers of your flowers and set aside to dry.

8. Punch 15-20 leaf shapes from scrap of light green cs. Ink the edges with the green ink and using the bamboo skewer or brush handle round some of the leaves to give them a 3D effect too . Leave a few flat {or again, all of them if you're not comfy with paper manipulating}. Set aside.

9.Using a corresponding cs scrap {or a white cs scrap with ink sponged on it}, cut out butterflies with either the SU Embosslit set or a butterfly punch. Set aside.

10. Using the SU "Four Frames" stamp set stamp the label, sprinkle with clear emboss powder and heat set. Punch out with the corresponding SU punch. Ink edges with corresponding colour to flowers. You can stamp on a sentiment now if you know what you are using the card for. I left mine blank for a later date.


I found it best to do all this "busy work" at the same time . Now comes the fun part...ASSEMBLING!


11.Start by adhering the leaf shadow piece to the left hand side of the card . Add the flowers next. I used two large and three small in the bottom corner and one large and one small in the upper corner. I used a dimensional dot for one of the small flowers in each corner just to add to the 3D effect. Next tuck in your leaves as you see fit.
{A little hint: I had a scrap piece of paper under the lattice so no glue would get on the inside of the card. you do have to be careful of glue placement when adding your embellies.}

12. Finish by inking the outside edge of card in colour of choice and spritz a little ink on that extra 5x7 piece of cs and glue it to the inside of the card when dry. Alternately, you could add a piece of subtle patterned paper to the inside. This "colour" on the inside of the card really helps to show off the lattice pattern. Add the punched butterfly to the center of the lattice and add your sentiment label with a dimension dot. Here's a pic of the finished blue card. All done... PHEEEEEEEEWWWWWWWW....

      
 No I'm not really done! One last little note. The pink card flowers are obviously not Stampin'Up. They are handmade flowers with a sprinkling of small pink flowers punched with a retro flower punch. I shared how to make these flowers on a previous posting titled "A Study In White". You can check them out there. Thanks for dropping by today and happy scrapping!

Sunday, November 6, 2011

Nov Sketchy Challenge

The November Sketchy challenge is up over at Canadian Scrapbooker . All entries containing at least one Canadian supplier while be eligible  for possible publication in an upcoming issue of Canadian Scrapbooker magazine.  Go give it a try. Here's this month's sketch:
...and here's my take on this month's sketch...


Yes...yet another graduation LO.  The little journaling spot is an idea I lifted from Gabrielle Pollacco on her recent 'Bliss" LO. You can check out her gorgeous work HERE .
     The postage stamp edging was inspired by a recent posting by my dear friend Kelly , where she showed a tutorial on how she achieved this edge with a round punch. I think my edges are alot bigger ...wrong size punch I guess LOL. But it's a great idea  and I actually used the half circle punched out pieces elsewhere on my LO. Can you find them?
 I simply inked the edges and then tucked them under my circle edge.Another whole" layer" without all the bulk.
One of my Canadian products on this LO is the cork stickers from Magenta...

 I really loved the look of them  but found them fairly difficult to work with as they tore very easily being so delicate. After just a little cussing and swearing, I figured it out. I made several cuts with my craft knife { like at the base of a bunch of leaves} and took the stickers off in several pieces , lining up the edges again as I laid them on my paper. It was much easier [ and a helluva lot less frustrating!} to line up the cut edges as compared to the torn edges! 
Here's one more close up:

So what are you waiting for? head on over to Canadian Scrapbooker and try your hand at this month's sketch! thanks for popping by! Toodles!

Monday, October 31, 2011

A Study in White { and love}

WHITE doesn't seem to be the right colour to be talking about on Halloween but it's all around me today!Check out what greeted me this morning when I arose!


Hardly seems appropriate for today! But thankfully we only got 11 cms of the stuff so we fared a lot better than many along the eastern seaboard!
But what I really wanted to share with you today is an all white LO that I did last night. Everything ,except for the white vellum butterflies and the Dusty Attic hinge [ painted white of course!}, was created from plain white cardstock. 
Earlier this summer, I stumbled across a fantastic paper artist by the name of Jeff Nishinaka. His work is phenomenal and you can check it out here. He works on quite a large scale using only white paper. Another artist I heard about just today is Elsa Mora. She also creates amazing work with mainly white paper and an exacto knife....except she does it on a much smaller scale! You can find her lovely work here.

Here's my work in white....


and here's a few close ups....


I absolutely love making my own flowers! I 'm amazed at how much plain old paper can be manipulated into various shapes.  I've added a simple tutorial to show you how I made the two main flowers in this LO.

Here's what you'll need :

white cardstock
embossing folders of choice{I used Textile  and Swiss dot}
retro flower punches small and medium size
2" and 1.5" round punches
Stickles { Star Dust}
Fabric tac { or glue of choice}
bamboo skewer/paint brush handle
leaf stamp
watermark ink and clear emboss powder
self adhesive pearls

For the sake of brevity, I've already stamped and embossed my leaf pattern onto cs, and also ran a few pieces through my Cuttlebug inTextile and Swiss Dot. I'm going to try and give directions for the two different size flowers a the same time....hope I don't confuse you!
Punch two med retro flowers and one small retro flower from the swiss dot cs.
Punch a 2"circle and one 1.5" circle from the textile cs. On the BACK of the punched circles , lightly draw five lines as shown. these will be your cut lines. Don't fret about being too perfect...it really doesn't need to be!

As you can see from the above photo, I've already cut out my stamped leaf and using the bamboo stick , have rounded and curled the leaves.
                                                                              
I tend to "cut off' the corners of the petals of the larger flower and sometimes take little snips along the top edges of the individual petals. Using the bamboo stick, I gentle curl the petals around it to "shape" my flower. The 2" circle above shows the layer that has been curled  and the 1.5" hasn't been shaped yet.
On the smaller swiss dot flower, I curl the petals downward on the bottom layer and upwards on the middle layer { both punched with the medium retro punch]. I usually just use the flat end of the bamboo stick to press in the center of the smallest retro flower as I cup it in my hand. Some people spritz their pieces with water before shaping...I didn't on these as I felt they curled just fine without it. However I do recommend it for really thick  papers. Of course you will need to air dry or use a heat gun on these layers if you choose to spritz.
Next , glue your layers together, making sure to stagger your petals. Finish with a pearl in the center of each flower. Paint tips of flowers with Stickles if desired...then assemble your leaves and flowers in an arrangement that is pleasing to you.


Just a couple more quick comments about my white Lo. The title was cut with "Storybook" cart on my Cricut. I wanted it to have dimension too, so I cut the words five times and then glued each layer together before painting it with a layer of Star Dust Stickles for a bit of pretty shimmer. This photo of me and DH was taken two weeks ago...it has nothing to do with weddings, or Valentine's day etc{ altho this WOULD make a gorgeous wedding Lo wouldn't it?} It was just a fav pic of the two of us and I wanted a mushy LO of me and my DH...still love him soooooo much after 23 years together! 
And speaking of long term love...I'll finish this post with a LO of my mom and Dad  who celebrated their 45th wedding anniversary last weekend while visiting us here in Corner Brook.


Thanks Mom and Dad  for setting such a wonderful example! Love you!
Thanks for stopping by. Have a great week...Toodles!

Monday, October 17, 2011

My Fab Trip and Oct Sketchy Challenge

             Canadian Scrapbooker has its October Sketchy Challenge up on its site. Check it out!

And here's my take on it! I obviously rotated the sketch but all's fair in love and war right? LOL


I chose to add my journaling around the edge of the page to help keep that "uncluttered" look. Now hurry on over to Canadian Scrapbooker  and give it a go. All LOs will be put in their online gallery but only LOs using at least one piece of Canadian product will be eligible for a possible publish in an upcoming issue of CS magazine!
                                                                  
 Well, as some of you may know, I recently came back from a trip to Edmonton to visit my dear sweet friend Kelly, who I originally met on scrapbook.com almost 2 years ago. OMG! From the minute I stepped off the plane I felt like I was with a friend I've known my whole life! I wish I'd had my camera handy {  I didn't! GASP!} to show you the cute sign she had written on  the backboard from a Martha Stewart score board ...it was a heart with the words nfldmichelle { My scrapbook.com name} ...yah right ...as if I wouldn't have recognized her! She was the hostess with the mostest! A beautiful home, a beautiful family and lots of yummy food! {Don't forget to email all those recipes that I forgot to take with me ...DUH!}. One of the BIG treats of the week was spending two full days at Canadian Scrapbooker's Scrap Carnival in Edmonton! What a BLAST!!!! From the awesome classes, to the fun contests and everything in between...those CS girls sure know how to have fun! Thanks Jackie and Katrina for calling me up to the front and giving me a little prezzie for having come from so far away!    

                             Here's a snap of Kelly and I with the CS girls...


and another of Kelly and I at our scraptable...


       One of the fun events at the carnival was a "Phototbooth' complete with silly props set up by Allison Orthner {who's Lights! Camera! Action! class was a lot of fun and very informative BTW!}
   Kelly and I were first in line to ham it up  and here's the LO to prove it! I used My Little ShoeBox "Audrey' line pps for this one and my new Tim Holtz Tattered Flowers die.. I was so excited to discover I could use it in my little ole Cuttlebug!

                                                                                  
and here's a close up of my first Timmie flower ....Thanks for the G45 brads that I used for the flower centers Kelly!

                                                                              
anyhoooo...that's it for tonight. I just want to say a GREAT BIG THANK YOU  to dear Kelly for such a fabulous week. It makes me sad to think that we are now thousands of miles apart again . Sure wish she was just next door. Thank God for the Internet. Toodles!